

GIF screen recordings on macOS
May 27, 2019
Update: I found droptogif instantly after posting this. Way, way better. But I still think my hack is cute, so I’ll leave this up here.
Update 2: Both the Drop to Gif and Automator below broke for me in the latest macOS upgrade, so I switched to zsh functions, which give me more raw control. I may revisit the Automator solution later and update when I do. Until then, I added these to my .zshrc files, in case others find them useful. They’re straight cribbed from the Stackoverflow answer.
mov2gif () {
	ffmpeg -i $1 -vf "fps=10,scale=480:-1:flags=lanczos,split[s0][s1];[s0]palettegen[p];[s1][p]paletteuse" -loop 0 screen.gif
}

mov2gif720p () {
	ffmpeg -i $1 -vf "fps=10,scale=720:-1:flags=lanczos,split[s0][s1];[s0]palettegen[p];[s1][p]paletteuse" -loop 0 screen.gif
}
I often need to send quick screen recordings of features or bugs. Quicktime has a built-in screen recorder, but it only outputs videos. GIFs are still the most consistent way to share recordings (from messenger.com to GitHub). Online gif converters clunky and slow, so I set out to stitch together my ideal system1:
- Use Quicktime to record
- Save screen recording
- ???
- Drag-n-drop GIF into browser text box!2
The Payoff
Setup
To start, you’ll need to brew install ffmpeg.
brew install ffmpegNext, you’ll create an Automator recipe. It’s pretty simple: we’ll be creating a Folder Action, adding “Filter Finder Items” to filter for movies, and finally, Run Shell Script.
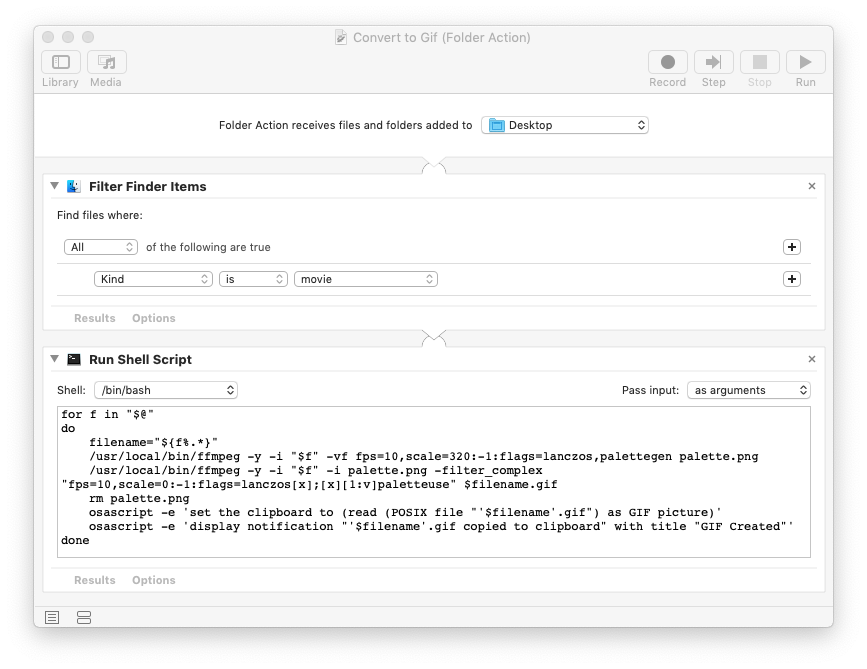
Shell Script
for f in "$@"
do
	filename="${f%.*}"
	/usr/local/bin/ffmpeg -y -i "$f" -vf fps=10,scale=320:-1:flags=lanczos,palettegen palette.png
	/usr/local/bin/ffmpeg -y -i "$f" -i palette.png -filter_complex "fps=10,scale=0:-1:flags=lanczos[x];[x][1:v]paletteuse" $filename.gif
	rm palette.png
	open -R $filename.gif
	osascript -e 'display notification "'$filename'.gif created by Automator script" with title "GIF Created"'
done
If you’re curious, we’re actually creating a temporary palette.png because ffmpeg’s built-in palettes are pretty terrible. Afterwards, I pop open the Finder with the GIF selected (in case the folder is packed) and also send of a notification, so in case someone aside from me is using my laptop, they’re not totally confused why Finder has decided to pop up.
That’s it! If you find it useful, let me know. If you have ideas on how it might be improved, ping me at @ehfeng.
Credit
Most of this was just piecing together tips from other people into my ideal workflow. So if this isn’t quite what you wanted, this is how I figured out my system!
Footnotes
-
I know there are plenty of apps that do exactly this, but given I only need to do this once a month, I prefer to reduce my dependencies on closed-source hobbyist apps where there’s little to no chance of maintanence or support. And having worked in software, I’m painful aware of just how likely bugs are to happen. ↩
-
Ideally, the GIF would be in your clipboard.
pbcopy < example.gifdoesn’t work (you get incomprehensible bytes when you paste) and using Applescript only copies the first frame of the gif. Even if you manually try to copy paste the gif from Finder into the browser, it just pastes the filename, so this actually only works via drag-n-drop. ↩